Pages

DIY Tutorial Panel Window Treatments

Pin It Now!

 DIY Panel Window Treatment


These are so easy to make and yet they are quite impressive (if I do say so myself)
I made the gray window panels for my daughter's room but I also made some for a friend's master bedroom last week, using cream and black fabric for a very dramatic effect.  I apologize for the picture quality, she snapped these with her phone and texted them to me.

This is what you need for this project...

For a window that measures 40" (from trim edge to trim edge) wide by 100" (from top trim edge to floor)...

3 1/2  yards of fabric "A"
2 1/2  yards of fabric "B"
6 1/2 yards of liner fabric
Curtain Rod
Rings and Clips to hang panels on rod

First of all, you need to decide how large you want to make your panels.  I wanted mine to
cover the window (when pulled closed) although they would most often be pushed to the side causing a gathered look.  I hung the rod above the window and wanted the panels to barely graze the floor.

These were the measurements for my window -  40 x 100 (roughly from moulding to molding):
To make the gray chevron panels:

Cut 6 panels of Fabric "A" to measure 20.5" x 45"
Cut 4 panels of Fabric "B" to measure 20.5" x 45"


***If you are making the black and cream panel: 
you need 8 panels of fabric A 
and 6 panels of fabric B, 
each cut at 14.75" x 45"***


Alternate sewing the panels together with right sides facing each other until you have 5 panels (or 7 panels if you are making black and cream pattern).  Be sure to keep your pattern going in the same direction and consistent.

Now do the same with the remaining 5 (or 7) panels.  You should have two "striped" panels that measure about 103" x 45".

On each of those panels, press open all seam interfacings (where you sewed each panel together).

Next, cut fabric lining to match the exact size of each sewn panel.
With right sides facing each other, sew the lining and panel together along the sides and then trim the salvage edge.
Turn right side out.
Re-measure your panel with your window and adjust your hem accordingly.
Turn top and bottom edges in (as much as your measurements tell) and press with hot iron.
Sew top-stitch edge around the entire panel and voila your panel is done.

Add your clip rings (evenly spaced across top) and hang on the rod. Pin It Now!

Weenie Dog Adventures

Pin It Now!

The Adventures of a Weenie Dog

This is an unusual post for me... it has absolutely NOTHING to do with painting, sewing, cooking or crafting!  I was just looking at pics on the computer and cracking up over the many hilarious circumstances my dog finds herself in!

My ten year old came walking into my office with Cocoa dressed in a bra and panties...
Her ears are down and just look at the expression on her face... she's mortified!


We were taking Cocoa to the ball field for my daughter's game and I turned around and looked in the backseat. They had her buckled in just like a person, sitting up on her back haunches.


Cocoa loves to run around the pool while the kids are swimming and until her paws toughen up, she usually injures them at the beginning of every summer.  This summer my girls made her little booties using their hair bands and baby socks.


She gets to wear lots of American Girl clothes.


Doesn't she look like the princess she is?


We lit her up at Christmas and it made the best photo for our card.  I was involved in this one!


Yes, they tried to teach her to skateboard.  No, it didn't work.


Christmas Pajamas


A special seat in the packed car... can you say Road Trip?


Just a little humor to hopefully bring a smile to your face today :)


Pin It Now!

Graphite Armoire

Pin It Now!

Graphite Armoire

I recently finished this piece for my daughter's room.  I found it on Craigslist for $50 and it came in a set with a nightstand... I just haven't had a chance to paint the nightstand yet.

This is the before pic...  WOoHOo! I actually remembered to take the before pic this time :)

I used ASCP Graphite, Pure White and Florence paint colors on this piece.  
I started out by painting the entire thing with 2 coats of Graphite.   

After that paint dried, I used a dry brush technique to apply Old White (very lightly) 

 and a little Florence (also applied very sparingly)

 I only dry-brushed the drawer and cabinet facings and then distressed them just a bit.  
I didn't sand or distress the top or sides.  

 I found these SUPER COOL pulls at Hobby Lobby.  
It softens the piece up a bit, don't you think?


Overall, I'm thrilled with this piece of furniture.  
It is SOLID and sturdy with plenty of drawer space for my "Little Tween"


Pin It Now!

Crochet Headband Pattern

Pin It Now!

Crochet Headband Pattern

First of all, isn't this adorable?  I'm very proud of my creation!  I've crocheted many headbands from various patterns but I wrote this one myself.  It's a collaboration of my favorite stitches and looks.  This headband is super easy and can be made in about 30 minutes. 

Bear with me because this is the first time I've attempted to "write" a pattern.  Here we go...

I used an "H/8" hook - 5.00mm
I used a polyester yarn

FIRST - FORM THE BAND...
Chain 8

ROW 1:  
1SC 1DC in second ch from hook, 
*skip next chain, 1SC 1DC in next ch, rep from* to end of row, 
ch 1 turn.

ROW 2
*skip next stitch, 
1 SC 1 DC in next stitch, 
rep from * to end of row, 
ch 1 turn.

Repeat row 2 until work measures 19" from the beginning.
(you may have to adjust according to your head size 
but just remember to make it small and tight because most yarn stretches.) 
My Tip - make this headband WAY TOO SMALL and it will fit just right!

Slip stitch beginning and ending edges together and fasten off.


SECOND - MAKE THE FLOWER...

Chain 6, slip stitch into first chain to form a ring.

ROUND 1:
1 ch, work 15 SC into ring,
slip stitch into first SC

*IF YOU WANT TO USE TWO YARN COLORS, THIS IS WHEN YOU CHANGE YARN 

ROUND 2:
*3ch, YOH, insert hook into next st, you and pull through.
YOH, pull through 2 loops (leaving 2 loops on hook)
YOH, insert hook into next st and pull through.
YOH, pull through two loops,
YOH and pull through all 3 loops.
Slip stitch into next SC*
Repeat from *to* 4 times, making 5 petals.  
Slip stitch into last SC
Fasten off

LAST STEP - attach flower to headband using a yarn needle and yarn


Here are some variations using different yarn colors and a couple of headbands without flowers...


Pin It Now!

Candy Cane Kiss Cookies

Pin It Now!

Candy Cane Kiss Cookies

I made these for a Cookie Swap party this week and they turned out really yummy!  I got the recipe from Recipe Girl's website.  These are fairly easy to make and so adorable...


Pin It Now!

Cranberry Baked Brie

Pin It Now!

Cranberry Baked Brie

This appetizer is so amazing!  
I saw it on Pinterest and followed the link to the Chef In Training website.  
I made it for a dinner party this past weekend and it was a huge hit!   
This is not a difficult recipe but it is sure to impress.   
How can you go wrong with brie, toasted pecans, brown sugar, cranberries and a little maple syrup simmered into the mix?  
WOW!  
And on a side note... I served mine with Ancient Grain Crackers and Breton Crackers.  
Let me know what you think!

Here's the recipe link...


... and here's a link to my Pinterest boards:
Pin It Now!

Staging Built-In Bookcases

Pin It Now!

A little makeover...       A little chalk paint...       A BIG difference

This is the AFTER picture.  It's crazy how quickly things can become outdated.  My built-in bookcases in my hearth room were decorated (by me) about 6 years ago.  I used a lot of picture frames and a lot of gold accents when I originally staged them.   There were Indian accent pieces (remember the bamboo and elephant decor phase about 10 years ago?) They were starting to look old and out of style.  I didn't want to spend a fortune redecorating them so I got a little creative.

This is what they looked like before...

With a little chalk paint, I transformed some of the items.


I used a combination of ASCP "Provence" and "Florence" on this gold tin.  


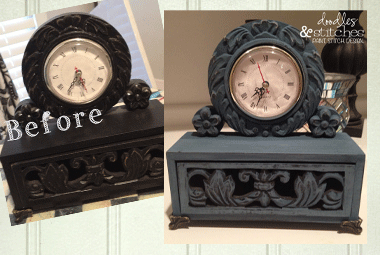
I used ASCP "Aubusson"on the clock

ASCP Florence was the color choice for this mini trunk.


And I painted ASCP Duck Egg on this old bottle that I found.  
I thought the roses were so pretty... it's hard to believe it was originally a liquor bottle!

I also bought a few mercury glass accent pieces and added them to the mix.
After Christmas, I will take down the gold frames and decor on the mantle.  I plan on adding more mercury glass items to that area.

Here's an up close photo of each bookcase...


Pin It Now!

A Moment of Silence

Pin It Now!

In memory of those who lost their lives Friday 
In sympathy to the loved ones of those slain
In gratitude to the heroes
In prayer for the traumatized
In hope of a world where this does not ever happen again


Like you, I have cried many tears and uttered many prayers over the weekend.  This tragedy weighs so heavily on my heart as it does with most of our country.  I am joining many other bloggers in a "Moment of Silence" instead of posting today's content as originally planned.   

We will pause to reflect and pray.  
We will pause to hug our loved ones just a little longer and a little closer.

"The LORD is near to the brokenhearted and saves the crushed in spirit."
-Psalm 34:18 


Pin It Now!

Snickerdoodle Muffins

Pin It Now!

Snickerdoodle Muffins

Serve these to your out of town holiday guests and you're sure to impress!  
They're perfect for Christmas morning too.


Ingredients:

2 eggs
1 c. milk
1/2 c. sugar
2 1/4 c. self-rising flour
2/3 c. oil

Mix together above ingredients and pour into a greased muffin pan.

In a separate bowl, mix together the following ingredients...

2 Tbsp butter
2 tsp cinnamon
2 Tbsp flour
2 Tbsp brown sugar

Drop about 1/2 tsp onto the top of each unbaked muffin batter cup.  
Bake at 400 degrees for 20 minutes.
Pin It Now!

Link Party Postponed

Pin It Now!
I'm postponing Fabulous Friday Link Party until after the Holidays!
I'm sorry but things are way too crazy this time of year and I just don't have the time to pull it off.

I promise to email all of you and let you know when they resume.

Happy Holidays! Pin It Now!

Link Party 23

Pin It Now!
Fabulous Friday Link Party #23


Thank you to everyone who entered something last week.  
I really enjoyed reading all of your blogs!

If you are a featured winner this week, 
please grab a "FEATURED BUTTON" below!
Photobucket

This week's FEATURES:

Such cool potato sacks as stockings hung over the piano


Super creative!  She made this cool skirt out of neck ties.


 This is a gorgeous mantle.  I love the decor!


This is a cool advent calendar, reminds me of pallet wood.


Wont' you join us for this week's party?

Rules:
Share your DIY projects (crafts, furniture, sewing)...do not post link parties or advertisements.
Post a permalink to your POST only - not your entire blog.
Grab my BUTTON (below) and attach it to your posted link or blog sidebar...


Pin It Now!