Pages

National Book Lovers Day

Pin It Now!

Do you love to read?

I absolutely love books!  In honor of "National Book Lovers Day", I thought I'd write a short post about what I'm reading and what I've read lately that I recommend.  I would love to read comments about what you are reading too!

I just finished reading The Nightingale last week.  
It was really good!

These are the two books I'm currently reading...
The Life-Changing Magic of Tidying Up
and
How to Blog for Profit Without Selling Your Soul


I sincerely love Elin Hilderbrand books but I'm not as crazy about her most recent one.
My all time favorite is The Blue Bistro probably because I'm a FOODIE.


And then when I think back over the past 5 years to the best of the best books I've read, 
these are always going to be on that list...


I'm really looking forward to my next "Reading for Pleasure" book.
How do you find your next good read?
Here are a couple of online resources that I use...

Just type the name of a book you like and they give you recommendations based on that.

This site gives great reviews and lots of lists.

Happy National Book Lovers Day!


Pin It Now!

Super Cute School Supplies

Pin It Now!

How cute is this clipboard?
I bought it at Office Depot last week.
Don't you think SUPER CUTE school supplies make it easier to go back to school?

I'm a believer that adding a monogram or personalization makes CUTE supplies even better!


We went a little crazy.  In one afternoon, 
we added her monogram to everything, including UGLY composition books.


We turned this plain green binder into...


ahem... an ADORABLE green binder!  Right?


Same goes for this blue binder...


Perhaps all this will inspire a desire to do homework 
but
I doubt it.


I buy all my vinyl from Happy Crafters (Affiliate)

Read my Disclosure HERE.

Pin It Now!

Gold Foil Word Pillow - Pillow Instructions

Pin It Now!
 

If you read my blog at all, then you know how much I love throw pillows.  I have shared tutorials before but I put a different spin on this one.  I will be walking you through the process, once again.  I will also direct you (in detail) on how to add GOLD FOIL to the pillow.  This is such a fun project and it's really fast.  I made two of these pillows in less than 2 hours and that includes taking photos for the tutorial. 


For this project, I used synthetic down pillow inserts from Pillow Cubes.  
These pillows measure 17" x 13".  

Our first step, is to cut the fabric.  
The FORMULA (below) is the easiest way to figure out your cutting measurements...


FORMULA:
(Height of pillow) + (1/2 inch)
(Width of pillow) x2 + (7 inches)

My pillow measures 17”(h) x 13”(w)

In order to sew a covering for a pillow that measures 17" x 13"
this is how you'll calculate using the above formula...
(17") + (1/2 inch) = 17 1/2 inches
(13")x2 = 26 + 7 inches = 33 inches


Cut fabric to measure 17 1/2 inches x 33 inches

Then... you turn under the short edges 1/4" and sew
then turn under again 1/4" and sew again.  
Do this on both short ends.


Next step, with right sides facing each other, 
fold fabic to the size of the pillow 
with an overlap (that will be about 6 inches)
Then pin the outer edges and sew, as shown in diagram…


 Now, turn the pillowcase back to "right-side" out.  Push out the corners with a blunt edge
(like a ruler or scissor handle)
and place the covering on your pillow.
This is what the back opening looks like…


And that's how you make an envelope pillow cover.

Now, let's move on to the GOLD FOIL portion of the tutorial HERE.

***Disclosure:  I was compensated with 2 free sample size pillows for this project by Pillow Cubes.  The opinions expressed are my honest opinions and were not swayed by these free products.
You can read more about my Disclosure policy here.***

I'm so happy to have discovered Pillow Cubes. They have many different types and sizes of pillows. Their shipping was very fast and the prices are GREAT.  If you have shopped for high quality, down pillows, you know they can be very pricey.  I am happy to have found a new supplier.  So, check them out.  You won't be disappointed!  Here's the link to their website...
Pillow Cubes 

Here's a link to my previous pillow posts and tutorials too...

Mix, Don't Match Your Pillows
Burlap Holiday Pillows
Hello Beautiful
DIY Beach Pillows
DIY Slip Pillow Tutorial

Pin It Now!

Gold Iron On Vinyl Tutorial

Pin It Now!

Gold Iron-On Vinyl using Silhouette Cameo


I have been wanting to try out this gold iron-on vinyl for months but to be honest, I was a little intimidated.  In the past, I have had my fair share of "iron-on" FAILURES, using my ink jet printer and t-shirts.  Still, I decided to give it a try.  I was so surprised that I didn't have any mishaps or hiccups along the way.  The foil worked perfectly and the pillow looks like it was professionally made.  This was such a fun project and it was very quick!  I made two pillows in a couple of hours and that includes all the design work, sewing and photographs.  Here's the other pillow I made...


I'm going to walk you through every step of this DIY project.  

The ENVELOPE PILLOW sewing tutorial can be found here.  
This DIY post only includes the gold iron-on portion of the project.

Affiliate - Read my Disclosure HERE.


First of all, I bought my gold iron-on from Happy Crafters.
They have many great products that I love using with my Silhouette Cameo.

Let's get started on the tutorial.
Start by opening a "new file" in Silhouette Software.  
I set my design page settings to 12 x 12 inches.


Go to 'library' and choose your design.. I used the 'echo park arrows' from the Silhouette store.


Choose 'object' tab and select 'ungroup'. 
Delete unwanted arrows.


Select "arrow"


Click 'object' tab and then click 'rotate', rotate 90 degrees clockwise.


Next, add text.
I used the font "dazzling diva" for the word HELLO.


I used the font "Aaargh" for BEAUTIFUL. 


From the 'Object' tab, I grouped all the text and arrow.
Then, I adjusted the size of the graphics to fill the screen.


 Now, it's time to flip the image.  
Go to 'object' tab, choose 'mirror' and then 'flip horizontally'.


Now open 'cut settings'


Choose 'Heat Transfer Material - Smooth'
Adjust your silhouette blade to a "3".


Send to Silhouette Machine.


Attach your foil to the Silhouette Cutting Mat.  Attach it gold side DOWN. 
Sorry, I don't have a photo of this step.


Choose "Cut" on your Silhouette Machine and Software.

After the machine has finished cutting the gold foil, remove the foil from your silhouette cutting mat. Now begin peeling away the "negative space" around your design, leaving only the part that you want to be ironed onto your pillow.


See (below) the clear sticky backing that is left behind with the design?


Mark the center of your fabric, as shown below, then remove the pillow insert.


Now place your design on the fabric.  
The design will adhere but it's not too sticky so you can move it around.


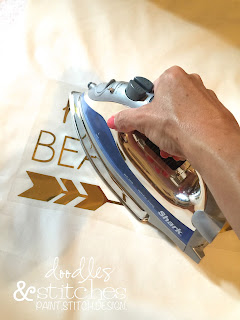
Place a towel on a hard surface and set your iron to HIGHEST HEAT with NO STEAM.


Press down with iron on the design for 30 seconds.  I moved the iron around so I didn't singe the white fabric.


Turn the fabric over and press the back side with your iron again for 30 seconds.

Remove iron and allow the design to cool completely.

Now, peel the design slowly.  


This is what it looks like after you have peeled away the transfer. (below)


Ta-da!  It's beautiful, right?

You can find the sewing tutorial for the envelope pillow cover HERE.


Pin It Now!