Pages

DIY Cloth Napkins TUTORIAL

Pin It Now!


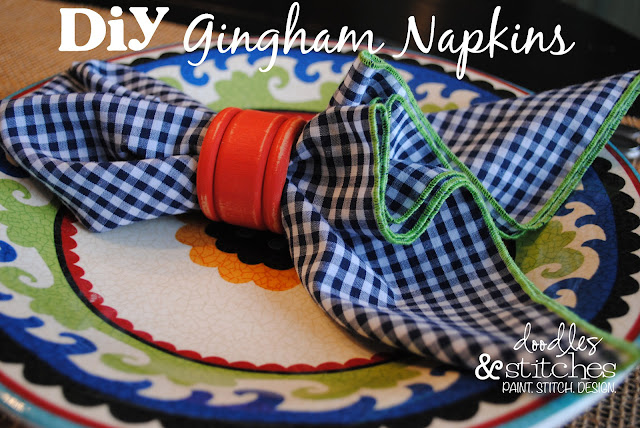
I made these cute cloth napkins using my new serger.

FABRIC...
The fabric I used is a cotton/poly blend which means that it's wrinkle resistant.  It's not fun to have an adorable set of cloth napkins that are the size of tennis balls when you get them out of the dryer - all wadded up and in need of pressing.  I have many kinds like that too but I am trying to remember to only use a poly blend fabric for future napkins.  It's just so much easier that way!
cutting...
First of all, napkins come in all different sizes.  Most range in size from 12 inches to 18 inches.  I made mine by cutting my squares of fabric 17" x 17"
Machine setings...
You need to set up your machine to do a rolled hem.  
Here's a great tutorial...


After simply running all 4 edges under the serger, you will have a completed napkin.


I used contrasting colored thread for the edges...
green gingham with turquoise thread
navy gingham with lime thread
turquoise gingham with red thread
pink gingham with lime thread
orange gingham with turquoise thread
yellow gingham with red thread


Pin It Now!
Serger 101

Pin It Now!
Happy Birthday to me!  I got this awesome serger for my birthday.  I thought I'd write a couple of posts about my serger and the helpful information I found online that assisted me in threading the machine and knowing all the ins and outs.
First of all, I wanted this machine for making cloth napkins and hem work easier.  I wasn't exactly sure how it worked but I love to sew and thought it would be a helpful addition to my sewing room.  After some research, I figured out that I wanted the Brother 1034D.  It wasn't too fancy or too basic and seemed to do everything I needed.  I sent my husband an email with the link to the serger… made it really easy for him to order it for my birthday… smart girl ;)
Then I waited.  The serger came in on Friday but my birthday wasn't until Monday.  My husband and kids wouldn't even let me open the box and look at the Users Manual.  So, I watched Youtube videos and blog tutorials on how to thread the serger and the different techniques that I could use.  I was starting to seriously DOUBT my decision to buy the machine because I was reading about lots of problems.  
I read a lot of info online about how difficult it was to thread!
I also read about how to remove the needle and thread finger to do a rolled hem.  I didn't even know what a rolled hem was - needless to say, I was a little concerned.  Why did I want a serger in the first place?  I knew nothing about them!!!  I got busy...  I read and marked all kinds of helpful blogs and youtube links and pinned them on my 
The morning after my birthday party, I set aside several hours for threading and figuring out the machine.  But fortunately I had discovered some great resources that helped and explained things so well that I sewed my first serger seam with no problems.  I removed the stitch finger and needle, rethreaded the machine and tried a rolled hem - PERFECTION!  I got out a stack of fabric and an hour later, I had a pile of fabric napkins.

Here's a link to the most helpful video I found on Youtube about...
I also found this tutorials about doing a rolled hem…

Since my birthday (3 weeks ago) I have made 6 sets of cloth napkins, 6 infinity scarves, a poodle skirt (for my daughter's 50s day at school) and a couple of maxi skirts.
I am so happy with my decision!
I will be posting several tutorials in the coming days about making items using the Brother 1034D.


Pin It Now!

My Favorite Free Script Fonts

Pin It Now!

Pin It Now!

Healthy You - Shrimp and Grits

Pin It Now!

A lighter version of Shrimp & Grits


Steve & I came up with this recipe last month after visiting Charleston for New Years.
 While in SC, we enjoyed quite a few helpings of shrimp and grits.  
When we got home, we were craving more shrimp and grits 
which our waistlines didn't NEED... if ya know what I mean!
So we came up with this LIGHTER version of our favorite recipe.

Ingredients for shrimp:
4 slices center cut bacon, diced
2 tsp minced garlic
1 shallot, finely diced
1 lb shrimp, peeled and deveined, seasoned with salt and pepper

Ingredients for grits:
6 c. water
1 Tbsp salt
1/2 Tbsp pepper
1 1/2 c. grits
1/4 stick of butter
1 c. reduced fat extra sharp cheddar, shredded (reserve 1/8 c)

Directions For Cheese Grits:
Bring salted water to boil.  Add grits and pepper, stir for 30 seconds.  Turn down heat to a simmer and cover.  Cook until water absorbed, don't let the grits dry out, add milk if needed.  Cook about 20 minutes.  When finished cooking, stir in butter and cheese.

Directions For Shrimp recipe:
While grits are cooking...
Cook bacon in skillet over medium heat until brown.  
Remove from skillet and set aside.
Add garlic and shallot to skillet and sauté for 2 minutes.
Add shrimp to garlic and shallot in skillet.
Cook 2 minutes per side (max) until pink.
Don't overcook the shrimp.

Plate the food...
Place grits in base of bowl, top with shrimp.  Sprinkle with reserved cheddar and bacon.
Enjoy!


Pin It Now!

Dorotha Pie Safe

Pin It Now!

Dorotha Pie Safe


This pie safe has been in my husband's family FOREVER... literally FOREVER.  
When his Great-Aunt Dorotha passed away, he bought it at the Estate Auction.  
It was built by Dorotha's grandfather.  
I cannot even comprehend how old that makes this piece of furniture.  
All things considered, she was in pretty good shape. 
We cleaned her up and kept her for the past couple of years in our dining room, as she was.  


So for a long while now, I have been wringing my hands... 
how should I transform this piece of history?  
Will I give her the honor she deserves?  
I knew she would be an amazing piece to paint but I just couldn't decide... 
black? old white? country grey? duck egg?


Duck Egg... I am so glad I chose this hue.  It's the perfect color.  
It's soft and sweet but it lends character, don't you think?


I used Old White on the inside so that it was brightened up a bit.  
I love the old plank boards on the back panel - such beauty!
And this is the original glass, it's a little wavy in places but amazingly, it's in pretty good shape.


You can see the history in this cabinet.  I kept the original milk knobs and fixtures.


I had to change out the drawer pulls because they were in pretty bad shape. 
I found these at Hobby Lobby and I think they suit the style very well.  
As you can see, this drawer is broken but doesn't that just add to the story?


I love the side panels with the old wood... uneven and gaped.  
This is truly my favorite piece that I've ever had the pleasure of painting.


You can find the "Dorotha Pie Safe" linked up at... 

Too Much Time On My Hands


Pin It Now!